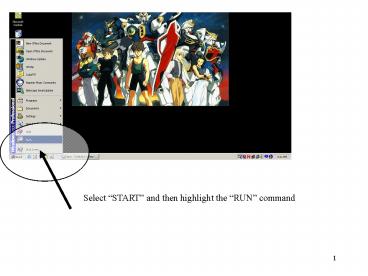
Select START and then highlight the RUN command - PowerPoint PPT Presentation
1 / 18
Title:
Select START and then highlight the RUN command
Description:
You will need your username to create the file, so if you don't remember it, ... Replace all instances of 'username' with your own username. ... – PowerPoint PPT presentation
Number of Views:74
Avg rating:3.0/5.0
Title: Select START and then highlight the RUN command
1
Select START and then highlight the RUN
command
2
After you select the RUN command, a window
will pop up on the screen. Type in
telnet eohsi.rutgers.edu in the box.
Please type it in exactly as you see it on the
picture above and then select OK
3
Type in your username at this screen and then hit
ENTER. If you do not know your username, then
just type in everything before the _at_ symbol in
your e-mail address. i.e username_at_eohsi.rutgers.ed
u.
4
- After you have entered your username, you should
be prompted for your password. Your password is
simply the same password you use to receive your
e-mail (not the password you use to get into your
computer when you login). Hit ENTER again
after you have entered your password. - please contact ENS 445-4159 if you do not
remember your password for e-mail.
5
If you have entered your username and password
correctly, then you should either see the left
screen or a menu screen. If you see a screen that
looks similar to above, then skip to slide 8
If your screen looks like the menu screen
pictured to the left, then continue to the next
page
6
Type in shell in the command line and then hit
ENTER
7
Your screen should look like the above after you
typed shell
8
- Now we need to create 2 separate files.
- a .forward file
- a .vacation.msg file
- Before we continue you should know
- the message you want others to see when someone
gets an auto reply message from you - your time of absence
9
We begin by first creating the .forward file.
To do this, we simply enter pico .forward at
the command line. Follow the picture above and
type it in exactly as you see it, then hit
ENTER.
10
You should see the above window open after you
have entered pico .forward. You will need
your username to create the file, so if you dont
remember it, please refer back to slide 3 where
your username is explained.
11
- Enter the following \username,
/usr/bin/vacation username - Refer to picture above for reference. Replace all
instances of username with your own username. - Please pay close attention to the different
directions of the / (slashes). You will find the
pipe character under the backspace key.
12
Once youve finished the above command line, now
you are ready to save this file. To save, simply
HOLD down the CONTROL KEY and hit the
letter X. When you do that correctly, you will
be asked if you want to save the modified buffer
on the bottom of the screen. Type in Y for yes.
And then hit ENTER twice. You should be put
back in to the shell screen automatically
afterwards.
13
Now we are finished with the .forward file,
your screen should look similar to above. We are
now ready to proceed to final steps of this
process.. Almost done.. Yeah!!!
14
We are now ready to make your away message. To do
that, simply enter pico .vacation.msg on the
command prompt. The procedures are almost exactly
like the file we have just created.
15
We are in the editing screen again once we have
entered pico .vacation.msg. From here
you can enter any message you like. The message
you select will be the message people receive
when they send e-mail you while you are away. We
have a sample of a typical message. You can
follow your own format if you like.
16
Above is a sample message. You can enter your own
message in here. When you are done, Hold down
CONTROL KEY and hit X. It will asked you
want to save again. Enter Y for yes and hit
ENTER twice to complete the setup.
17
Enter exit at the command prompt and all
windows should close. We are now finished with
setting up a vacation message. Congratulate
yourself for you are now a master of UNIX ?.
18
- VERY IMPORTANT MESSAGES
- DO NOT E-mail yourself messages when you have
this option on. - DO NOT E-mail yourself messages when you have
this option on. - DO NOT E-mail yourself messages when you have
this option on. - Remember to take off the vacation message when
you return or you will continue to send out your
vacation message!!


