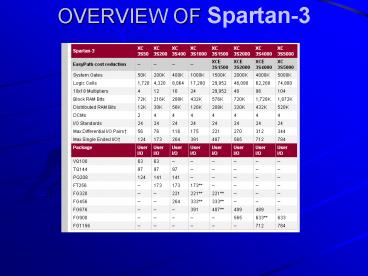
OVERVIEW OF Spartan-3 - PowerPoint PPT Presentation
Title:
OVERVIEW OF Spartan-3
Description:
2. Navigate to the folder that contains your Verilog source code. ... Select the top level Verilog module in the Sources in Project box. ... – PowerPoint PPT presentation
Number of Views:39
Avg rating:3.0/5.0
Title: OVERVIEW OF Spartan-3
1
OVERVIEW OF Spartan-3
2
DESIGNFLOW
HDL RTL Simulation
Create Code/ Schematic
Plan Budget
Implement
Synthesize to create netlist
Functional Simulation
Translate
Map
Place Route
CreateBIT File
Attain Timing Closure
Timing Simulation
3
What is Implementation?
- More than just Place Route
- Implementation includes many phases
- Translate Merge multiple design files into a
single netlist - Map Group logical symbols from the netlist
(gates) into physical components (slices and
IOBs) - Place Route Place components onto the chip,
connect the components, and extract timing data
into reports - Each phase generates files that allow you to use
other Xilinx tools - Floorplanner, FPGA Editor, XPower
4
Timing Closure
5
USING PROJECT NAVIGATOR
- There are six main steps to using Project
Navigator, as detailed below. - 1. Create a Project
- 2. Add Files to Your Project
- 3. Using ModelSim from Project Navigator
- 4. Synthesize, Place and Route
- 5. Program the board
- 6. Clean the Project for Archiving
6
Step 1 Create a Project
- 1. Start by opening Project Navigator from the
Desktop. - 2. Go to File -gt New Project
- 3. New Project Name, Location and Top-Level
Module - a. Give the project some kind of apropriate name
which describes it. - b. Remember spaces are not allowed.
- c. Set the project location to C\users\, Project
Navigator will automatically create a
subdirectory for your project. - d. Set the Top-Level Module Type to HDL
- e. Click Next
7
(No Transcript)
8
New Project Device and Design Flow
- a. Device Family Spartan-3
- b. Device xc3S5000
- c. Package fg900
- d. Speed Grade -5
- e. Synthesis Tool XST (VHDL/Verilog)
- f. Simulator Modelsim
- g. Generated Simulation Language Verilog
- h. Click Next
9
(No Transcript)
10
- New Project Create New Source
- or
New Project Add Existing Sources You should
keep your Verilog source files in a subdirectory
of C\local from your project. Please use good
sense and make sure to keep your files organized,
CVS is a good idea.
11
- Make sure that the Copy to Project box is
checked,
12
New Project Information Please make sure to
double check the information displayed in this
screen.
13
Step 2 Add Files to Your Project
- 1. Right-click in the Sources in Project box and
select Add Source from the drop down menu. - a. The Sources in Project box is in the upper
left of the Project Navigator main window. - b. By select Add Source instead of Add Copy of
Source, you can avoid having duplicate files and
accidentally using an old version of a file. - 2. Navigate to the folder that contains your
Verilog source code. - 3. Select the various verilog files as required
by your project. - 4. Click Open to add these files to your project.
- Modules listed with a ? next to them are missing.
14
Step 3 Using ModelSim from Project Navigator
- Since we all are familiar using NCSim or running
ModelSim directly from desktop we can skip
detailed information of this step.
15
Step 4 Synthesize, Place and Route
- Xilinx Project Navigator was designed primarily
to manage this step, the - Processes for Source box is the primary way to
access all of the tools and reports - generated during the implementation process.
- V means that that step in the implementation
process completed - successfully.
- ! means that that step has warnings, which you
may need to look into. - Most of the warnings given by Project Navigator
can be safely ignored. - Design Rule Check or DRC violations are very
serious and cannot - be ignored
- X means that that step failed and you will need
to examine the error log - (at the bottom of the Project Navigator Window)
to see why. - ? means that something has been changed since the
last time that step - was run, and it should therefore be rerun.
- Select the top level Verilog module in the
Sources in Project box. - This will almost always be NOVA_TOP.v
- Double-Click Generate Programming File step in
the Processes for Source - box.
- This will cause Project Navigator to attempt to
synthesize, place, route and - generate a bitfile from the Verilog you have
given it.
16
- Step 5 Program the Board
17
- SYNTHESYS PROCESS PROPERTIES AND USEAGE
18
(No Transcript)
19
- Library Search Order File -gtThe Library Search
Order (LSO) file specifies the search order that
XST uses to link the libraries used in
VHDL/Verilog mixed language designs - KEEP_HIERARCHY
- true allows the preservation of the design
hierarchy, as described in the HDL project. - false hierarchical blocks are merged in the
top level module. - soft allows the preservation of the design
hierarchy in synthesis, but the KEEP_HIERARCHY
constraint is not propagated to implementation. - SLICE_UTILIZATION_RATIO is an area constraint
that defines the area size (in ) that XST must
not exceed during timing optimization. - If the area constraint cannot be satisfied, XST
will make timing optimization regardless of the
area constraint.
20
(No Transcript)
21
(No Transcript)
22
Xilinx Synthesis Constructs
- BOX_TYPE
- LOC
- REGISTER_DUPLICATION
- BUFFER_TYPE
- LUT_MAP
- REGISTER_POWERUP
- MAP
- RESOURCE_SHARING
- MAX_FANOUT
- RESYNTHESIZE
- CLK_FEEDBACK
- MOVE_FIRST_STAGE
- RLOC
- CLOCK_BUFFER
- MOVE_LAST_STAGE
- ROM_EXTRACT
- CLOCK_SIGNAL
- MULT_STYLE
- ROM_STYLE
- EQUIVALENT_REGISTER_REMOVAL
- OPT_LEVEL
- SLEW
- FSM_ENCODING
- OPT_MODE
- SLICE_PACKING
- FSM_EXTRACT
- PARALLEL_CASE
- SLICE_UTILIZATION_RATIO
- FULL_CASE
- PERIOD
- INCREMENTAL_SYNTHESIS
- PRIORITY_EXTRACT TIG
- IOB
- RAM_EXTRACT
- TRANSLATE_OFF and
- TRANSLATE_ON
- IOSTANDARD
- RAM_STYLE


