Metadata Module Landing Page - PowerPoint PPT Presentation
1 / 6
Title:
Metadata Module Landing Page
Description:
Login into the WebDirect Admin system and go to Site Preferences Metadata ... The most common Meta tags are 'description' and 'keywords' ... – PowerPoint PPT presentation
Number of Views:44
Avg rating:3.0/5.0
Title: Metadata Module Landing Page
1
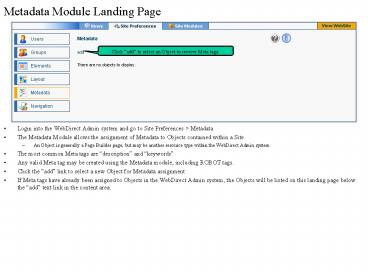
Metadata Module Landing Page
Click add to select an Object to receive Meta
tags.
- Login into the WebDirect Admin system and go to
Site Preferences gt Metadata - The Metadata Module allows the assignment of
Metadata to Objects contained within a Site. - An Object is generally a Page Builder page, but
may be another resource type within the WebDirect
Admin system. - The most common Meta tags are description and
keywords - Any valid Meta tag may be created using the
Metadata module, including ROBOT tags. - Click the add link to select a new Object for
Metadata assignment - If Meta tags have already been assigned to
Objects in the WebDirect Admin system, the
Objects will be listed on this landing page below
the add text link in the content area.
2
Add Metadata Select Object
Click Select Object to open a Window listing
all Object available to receive Metadata
Select the Module containing the desired Object
to open a list of Objects within the module.
Select the Object that is to receive Metadata
from the Module list
The selected Objects name will now appear in the
text field. This text may be edited for easier
reference.
- Click the Select Object button to choose an
object in a Module to receive Metadata. - When finished selecting an Object, click the
save button to save the selection and continue
to the next screen.
3
Edit/Add Metadata for Object
Click add to create Metadata for the Object.
- Once an Object has been selected, Meta tags may
be created for the selected Object by clicking
the text add link. - Click the done text link to return to the
Metadata Module overview page.
4
Add Metadata
Enter a valid Meta tag name
Enter the content of the Meta tag.
- Enter a valid Meta tag Name into the first text
field, such as keywords or description - Enter the Meta tag verbiage into the Content
field. - Click save to save the changes and return to the
Edit Metadata for Object screen. - Click cancel to return to the Edit Metadata
for Object screen without saving the changes.
5
Edit Metadata for Object
Click add to create another Meta tag for the
Object.
Click edit to make changes to an existing Meta
tag.
Click delete to permanently remove a Meta tag.
Click done to return to the Metadata Module
landing page.
- Click the text add link to create more Meta
tags for the Object, or - Click edit to the right of a Meta tag to open
the tag for editing, or - Click delete to the right of a Meta tag to
remove the Meta tag, or - Deleted items cannot be recovered.
- Meta tags that are accidentally deleted must be
rebuilt as they cannot be recovered. - Click done to save changes and return to the
Metadata Module landing page.
6
Metadata overview screen
Click add to select another Object to receive
Meta tags.
Click delete to permanently remove an Object
and its associated Meta tags..
Click edit to make changes to a the Objects
Meta tag(s).
- The Object will now appear on the Metadata Module
landing page. - Click edit to open the Object and edit its
Meta tags. - Click delete to remove all Meta tags for the
selected Object. The Object will be removed from
the Metadata Module. - Deleted Objects and their associated Meta tags
cannot be recovered but they can be rebuilt.


