Chicken Wing Dissection - PowerPoint PPT Presentation
Title:
Chicken Wing Dissection
Description:
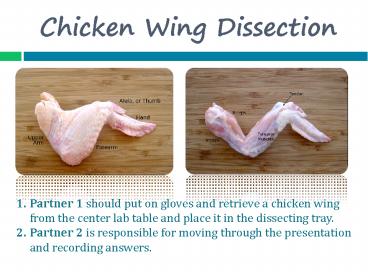
Chicken Wing Dissection Partner 1 should put on gloves and retrieve a chicken wing from the center lab table and place it in the dissecting tray. – PowerPoint PPT presentation
Number of Views:275
Avg rating:3.0/5.0
Title: Chicken Wing Dissection
1
Chicken Wing Dissection
- Partner 1 should put on gloves and retrieve a
chicken wing from the center lab table and place
it in the dissecting tray. - Partner 2 is responsible for moving through the
presentation and recording answers.
2
Remove the skin
- If the wing is greasy, try washing it with soap
to make it easier to handle. - Carefully remove the skin from the chicken wing
following the cutting pattern shown in the
diagram. - Only cut away as much skin as seen in the photo.
(Leave the skin on the hand). Do not cut through
any muscle tissue. - Answer questions 1 and 2
3
Muscles and Muscle Actions
- Find the largest muscle on the proximal end of
the wing called the biceps brachii. - Read through slides 4-7 and watch the movie.
- Then answer questions 3-7.
4
- Prime mover the muscle that provides most of the
movement
5
- Synergist muscle that assists the prime mover
These muscles all produce the muscle action of
flexion.
6
- Antagonist the muscle that opposes the action of
the prime mover
If the biceps brachii flexes, then the triceps
brachii would perform the opposing action of ?
7
Flexion and Extension
Click on the picture to watch the video. Then
try it yourself. Its fun! Answer questions 3-7
if you have not already done so.
8
Tendons
- Carefully pull the biceps muscle away from the
muscles around it but do not tear it. Find the
place where it attaches to the bone. Look near
the elbow joint.
Tendon Attaches muscle to bone
Answer question 8 Continue to the next slide.
9
The biceps brachii got its name because it has
two (bi) attachment points. These attachment
points are known as the origin.
- Origin The location
- where the muscle is
- attached to the relatively
- immovable end of the
- bone
Answer question 9
10
- Insertion end of
- the muscle that is
- attached to the
- movable bone
Insertion
Answer questions 10 and 11.
11
The triceps brachii has 3 origins and 1
insertion. You should refer back to this picture
when you draw and label these structures at the
end of the lab.
12
Joints
The place where the two bones meet is called a
joint or articulation. Look at the shoulder
joint or if you wish, remove the arm muscles and
view the elbow joint.
Answer question 12.
What kind of cartilage is this?
13
Ligament
Find a ligament attached to the proximal end of
the humerus. Or you can look for ligaments in
the elbow joint if you cut away the arm
muscles Answer question 13.
14
- Ligament Attaches bone to bone
Carefully cut through the ligaments. Answer
questions 14 and 15.
15
Draw it.
- Draw in the muscles and tendons and then label
the picture of skeletal muscle structures
Clean up directions on next slide!
16
Clean up!
- Throw the chicken parts in the garbage.
- Wash and thoroughly dry your tray and dissecting
tools. - Return all aprons and goggles to your lab
station. - Wash your hands thoroughly paper towels go in
the trash! - Use the Clorox wipes in your cabinet to clean the
table. - Finish your lab questions and submit your lab!
- Complete a lab participation rubric for your
group, be honest and discuss this with your
group! - Staple the rubric to the BACK OF YOUR LAB.
- Once finals begin, this lab will no longer be
accepted.


