
Titans Lacrosse Official Playbook - PowerPoint PPT Presentation
1 / 17
Title: Titans Lacrosse Official Playbook
1
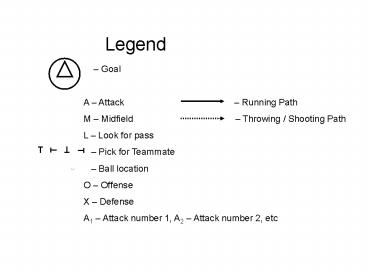
Legend
- Goal
- A Attack
Running Path - M Midfield
Throwing / Shooting Path - L Look for pass
- Pick for Teammate
- Ball location
- O Offense
- X Defense
- A1 Attack number 1, A2 Attack number 2, etc
T
T
T
T
2
Formation 33 (2, 3, 1) 2 up top, 3 across
middle, 1 behind
A3
X
Right wing
A1
A2
Crease
Left wing
M3
M1
M2
Top left
Top right
Note Midfield and Attack are in 2 triangles.
Players should always be within passing distance
of everyone in their triangle, and spread out
enough to make is difficult for defenses to cover
more than one player at a time.
3
Play 1 Diamond Play shown for right-handed sweep
from Midfield
A3
L
A1
A2
L
M3
L
M1
M2
Note M1 takes right-handed sweep across the top
and ends in M2 position. A3 (at X) follows drive
and ends at A2. Triangles rotate opposite
directions filling in remaining positions. Looks
for passing are A3 (who becomes A2), M2 while
approaching M3, and M3 while they are near the
goal. NEVER force a pass to the middle when
someone is covered.
4
Keep your sticks up and in shooting position, you
never know when that pass will come If your
defense leaves you at the end of your movement
roll into a shooting position if the primary
shooter gets 2 defense on them you might get the
chance to shoot. It is one extra pass but the
goalie will not expect it
5
Play 2 Ruby Diamond run from the Attack
Note For a right handed attack A3 sweeps to the
right side of the goal with the possibility of a
drive. Looks are A1 (before they reach the
crease), M1 and M2 as they cut to the crease on a
sprint rotation. If all else fails roll away from
pressure at the right wing and throw the ball
back to the player at X take up position at A1.
A2 sprints to X to guard the end-line on a shot
and incase the play needs to be redirected or
reset. M3 sprints to M2 as defense should
anything goes wrong and then over to M1 to back
up the pass in the second rotation. M2 goes to M1
to back up the pass in the first rotation and
then as a shooter to in the second. M1 is the
primary rotation shooter from midfield and then
clears out to an up top position to defend should
something go wrong. A1 cuts across the face of
the goal looking at A3 for a pass, but cuts
across to get out of the way. Once on the far
side set up high and work to get open in a
shooting position. For a left handed attack A3
sweeps to the left side of the goal and everyone
rotates in the opposite direction with the same
responsibilities.
6
Play 2 Ruby (Basic Rotation) Diamond run from
the Attack
A3
A1
A2
L
M3
L
M1
M2
7
Version 1 A3 drives to cage
Version 2 Quick pass to A1
Version 3 Quick pass to M1
Version 4 Hit M2 on second midfield rotation
Version 5 Nothing there reset to X let them
run another play
Again - Keep your sticks up and in shooting
position, you never know when that pass will
come If your defense leaves you at the end of
your movement roll into a shooting
position Attack should be aggressive on every
ground ball, If we dont have the ball we cant
score NEVER force the ball to the middle if it
doesnt work the first time roll away from
pressure and reset for another play. Middies be
ready for a double or triple rotation. Keep
moving it will confuse and tire the defense
8
Formation 40 (1, 4, 1) Iso Drive
A3
X
Crease
Right wing
A1
A2
Left wing
M2
M3
M1
9
Play 1 Fire Drive from Midfield
Note M1 recognizes a scoring opportunity due to
speed mismatch and calls for the offense to shift
to give them the isolation at the top. M1 backs
away to the top center giving time for offense to
shift and drawing their defense high in the
process. M1 must beat their defense and drives
towards cage. As drive starts M2 and M3 set picks
right behind the defense covering the attack.
Attack curves around any way they can to get open
for feed from M1. A3 wraps around opposite side
of their defense, but backs up shot when taken.
They must be the first player to the end line on
the shot so we can get the ball right back.
10
Play 1 Fire Drive from Midfield
11
Play 2 Water Drive from Attack
Note A3recognizes a scoring opportunity due to
speed mismatch and calls for the offense to shift
to give them the isolation from X. A3 gives time
for offense to shift and draws their defense to
one side of the goal or the other. M2 and M3 set
up high to give A1 more room to work. A1 and A2
sprint in to set picks for the midfield. A3 must
beat their defense and drives towards cage. As
the picks get set M2 and M3 cut sharply towards
the cage with sticks raised. M1 should wait to
see what side of the goal A3 has chosen to go on
and will cut to that side of the goal as a 3rd
look if their defense drops back towards the
goal. NEVER force a pass or attempt to drive
through 3 people. Pull it out and run a different
play.
12
Play 2 Water Drive from Attack
13
Formation 22 (2, 2, 2)
A2
A3
Right wing
Left wing
A1
M3
M1
M2
Top left
Top right
Note M3 and A1 can switch places
14
Note M3 and A1 set picks for attack. A2 are
looks for a quick goal. If the pass isnt there,
A2 and A3 will then set picks for A1 and M3 who
are now below. M1 can possible be a look if
his/her defender is ball watching M2 should drive
around to the outside as soon as the players go
to set their picks, the defense will think it is
an iso and may slide to defend leaving their
player wide open. If it doesnt work the first
time, roll away from pressure reset and let the
attack set their picks After the first pick M3
is way out of position should something go wrong
we must win all ground balls
15
Note M3 and A1 set picks for midfield. Play can
be run forever until there is someone open. If
you were a cutter, your next job is to pick for
the person who picked for you. If the looks
arent there, get it around and have midfield
around Mario
16
Note M3 picks for A2. A1 sets picks for
midfield. A2 drives to take shot. Midfield up top
cut to goal as an outlet. This again puts a
midfield in a dangerous defensive position, but
brings a short stick to the pick that should
switch with the short pole covering the midfield
for a major offensive advantage of a short stick
covering an attacker.
17
O3
O2
O4
O1
O5
O6
Recommended
CrystalGraphics Presentations


![[READ DOWNLOAD] Leading from the Middle: A Playbook for Managers to Influence Up, Down, an PowerPoint PPT Presentation](https://s3.amazonaws.com/images.powershow.com/10087125.th0.jpg?_=20240727027)


