
How to Manage and Track Activities from Dynamics 365 Mapping Tool
Title:
How to Manage and Track Activities from Dynamics 365 Mapping Tool
Description:
Learn how to manage and track all your sales reps activity who are on the go using Dynamics 365 mapping tool. How they can check-in, check-out, and how you can monitor… –
Number of Views:38
Title: How to Manage and Track Activities from Dynamics 365 Mapping Tool
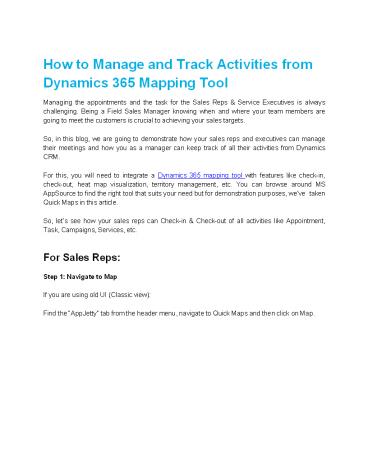
1
How to Manage and Track Activities from Dynamics
365 Mapping Tool
Managing the appointments and the task for the
Sales Reps Service Executives is always
challenging. Being a Field Sales Manager knowing
when and where your team members are going to
meet the customers is crucial to achieving your
sales targets. So, in this blog, we are going to
demonstrate how your sales reps and executives
can manage their meetings and how you as a
manager can keep track of all their activities
from Dynamics CRM. For this, you will need to
integrate a Dynamics 365 mapping tool with
features like check-in, check-out, heat map
visualization, territory management, etc. You can
browse around MS AppSource to find the right
tool that suits your need but for demonstration
purposes, weve taken Quick Maps in this
article. So, lets see how your sales reps can
Check-in Check-out of all activities like
Appointment, Task, Campaigns, Services,
etc. For Sales Reps Step 1 Navigate to
Map If you are using old UI (Classic
view) Find the AppJetty tab from the header
menu, navigate to Quick Maps and then click on
Map.
2
OR If you are using Unified view You can find
the Quick Maps App by clicking on the Dynamics
365 option.
3
Step 2 Check-in configurations Enable, set
radius, and enable check-in for the entity
(activity) - Navigate to Entity Mappings to
enable the Check-in for the activities (i.e.
Appointment, Task, Campaign, etc.)
- Click on any activity to enable the Check-in
option and Edit it.
4
- Check the checkbox of the Enable Check-In
option for that activity. After checking the
checkbox, click on the Update button by scrolling
down. - Navigate to Map Configuration Details and
select the user(s) you want to enable check-in
for. - In the Map Configuration Details page, set
Check in to Yes and set Check-In Radius (KM).
This Geo Radius will allow the user to check-in
within the set radius. Ex. If the check-in radius
is set to 20 KM, the Sales Executive can only
check-in to the activity when the executive is in
the radius of 20 KMs of the record.
5
- Step 3 Redirect to Map and plot activity data.
- Once you enable configure the Check-in option,
navigate to Maps, and plot the records by
selecting the activity entity for which you have
enabled the Check-in Feature. - Once records are plotted on the maps, click on
the pushpin to view the details of that record.
By clicking on it, the popup of the detail view
will appear. Here, the user will get the
Check-in button.
6
Once the Sales Executive completed the
appointment meeting with the customer, that
executive can again click on that record to
check out. Only if the Sales executive has
checked-in, then they will get the Check Out
button.
7
- By clicking on the Check-Out button, a popup of
Checkout details will appear to add meeting
notes and attachments if any related to the
meeting.
- By clicking on the Checkout button, the details
of the check-in check-out will be saved. - You can check the details from the Check-In menu
of Quick Maps. - For Sales Managers
- Step 1 View Check in check out details to
analyze the meeting data. - Navigate to Check-in menu available in Quick Maps
and click on check-in record to view the details.
8
- By clicking on any check-in record, you will
get the Check-in Check-out details with the
time spent for the meeting.
- You can view all the details regarding that
Check-in Check-out with inserted notes or
attachment if any. You can take actions
accordingly. These notes will also be added in
related activity detail.
9
In this way, your Sales Reps can easily manage
their activities and you can easily track the
amount of time spent by Sales Reps on a
particular activity to streamline your operation
and eliminate unnecessary elements. Source
https//www.appjetty.com/blog/how-to-manage-track-
activities-dynamics-365-mapping-tool/
Recommended
CrystalGraphics Presentations


