Final Edit - PowerPoint PPT Presentation
Title: Final Edit
1
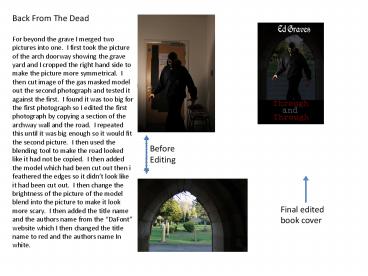
Back From The Dead For beyond the grave I merged
two pictures into one. I first took the picture
of the arch doorway showing the grave yard and I
cropped the right hand side to make the picture
more symmetrical. I then cut image of the gas
masked model out the second photograph and tested
it against the first. I found it was too big for
the first photograph so I edited the first
photograph by copying a section of the archway
wall and the road. I repeated this until it was
big enough so it would fit the second picture. I
then used the blending tool to make the road
looked like it had not be copied. I then added
the model which had been cut out then i feathered
the edges so it didnt look like it had been cut
out. I then change the brightness of the picture
of the model blend into the picture to make it
look more scary. I then added the title name and
the authors name from the DaFont website which
I then changed the title name to red and the
authors name In white.
BeforeEditing
Final edited book cover
2
Before
After
InceptionFor the Inception photograph I started
off by cropping the picture. I then used the
clone tool to take off all the light part in the
sky. I then replaced it with some brick in the
right hand corner. I then chose a part of the
arch to highlight, I then changed the contrast
with it and coloured in satin in the blending
option. I then used the magic wand to get the
image of the model, which I then shrank, I then
place the smaller image in the background. I
then feathered the edges, then I faded out the
image to make it ghost like. I then added the
authors name from name and book title from
DaFont where I chose themes from there I picked
gothic and from there I used Perry gothic. I
then coloured the title in red. I placed the
title at the top and the authors name at the
bottom.
3
The images before
Final edited piece
The Hanging Tree I started off by getting two
photographs. The first was a model with a tree
in the background whilst the other one was the
picture of the tree. I then cut out the tree
from the picture with just the tree in it. I
placed the said tree into the photograph with the
model in it. I then used the clone stamp to copy
the surrounding areas to make the second
photograph blend in with the first photograph. I
then copied apart of a patch of scrubland and
added this to the picture then blended it in. I
then changed the contrast of the picture to make
the picture look darker. This was followed up by
adding the authors name by using DaFont from the
Gothic menu then colouring it white. I then used
the Gothic medieval font, Perry Gothic again for
the title of the book. I added red to both the
Ts in the title.
4
Before
After
The Watcher I began by cropping the photograph
from the right hand side. I then used the inner
shadow within the blending options to get the red
sky. I selected the model, then I cut the model
out and put him on another layer. I followed
this up by putting an outer glow around the model
using the outer glow tool under the blending
options. I finished this off by putting in the
authors name using DaFont site. I picked the
gothic text for both Adding red to the book title
and white to the authors name.
5
Before
After
The Ancient stone For this book cover I took the
picture of the model who was walking like the
ghost in the priory lower croft. I put it on the
back of a black background. I had to change the
lighting and the contrast to get the right effect
of the light as the model walks towards the
doorway. I then chose the elliptical tool so I
could get a fisheye lens effect to overlay the
photograph to make the picture stand out, I then
feathered the edges to soften the picture. I
finish the book cover off by adding a title from
DaFont. I chose the colour red as this seemed
more appropriate for a horror title then I added
the authors name in grey.


![Read [PDF] Nudge: The Final Edition PowerPoint PPT Presentation](https://s3.amazonaws.com/images.powershow.com/10086605.th0.jpg?_=20240726088)


![[PDF] Final Fantasy XIV: Heavensward -- The Art of Ishgard -Stone and Steel- Full PowerPoint PPT Presentation](https://s3.amazonaws.com/images.powershow.com/10089805.th0.jpg?_=202408011211)


![get [PDF] DOWNLOAD A Symposium of Connectivism: Definitive Final Form Editio PowerPoint PPT Presentation](https://s3.amazonaws.com/images.powershow.com/10059427.th0.jpg?_=20240619078)


